

|
|
|
This section describes how to create framed HTML documents. Frames enable you display more than one web page on the screen. Frames divide the screen into multiple, scrollable regions enabling you to present information in a more flexible and useful fashion. Each frame can be given an individual URL and name, allowing it to be targeted by documents in other frames. Each frame can also be resized by the user. Sizzling HTML Jalfrezi uses frames to display a toolbar and contents strip around the main body of text.
Currently frames are only supported by Netscape Navigator 2 upwards and Microsoft Internet Explorer 3 upwards.
<FRAMESET>, <FRAME>, <NOFRAMES>, TARGET, ROWS, COLS, FRAMEBORDER, BORDERCOLOR, FRAMESPACING, NORESIZE, MARGINWIDTH, MARGINHEIGHT, SCROLLING, <IFRAME>
Frames are displayed through a Frame Definition document. The frame definition describes the number and position of the frames and the URL of their contents. You cannot write the contents of the frames within the frame definition - these must always be held in separate documents.
In a frame definition document, the
<BODY>
tag is replaced by the <FRAMESET> tag. The <FRAMESET> tag will be ignored if any tags normally found within the <BODY> element are placed before it. The <FRAMESET> container holds the <FRAME> elements which describe the frames that will make up the page.
A framed page layout is defined in terms of rows and columns using the <FRAMESET> and <FRAME> elements. The example below shows the web documents one.htm, two.htm and three.htm displayed side by side in columns on the screen. The first page is set to 80 pixels wide, the width of the second page is set to 25% of the available area and the third page should take up all the remaining space.

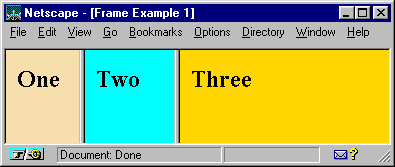

<FRAMESET COLS="80,25%,*">
	<FRAME SRC="one.htm">
	<FRAME SRC="two.htm">
	<FRAME SRC="three.htm">
</FRAMESET>
To arrange your frames horizontally rather than vertically, use the ROWS attribute in place of COLS. These attributes define the shape of the frames as row heights or column widths contained in a comma separated list. They are described in terms of absolute height in pixels, percentage values from 1 to 100% or as relative values using an asterisk ( * ). Incidentally Netscape browsers have a tendency to round frame sizes to the nearest 10 pixels. The total height of all rows must equal the total height of the window, so the values may be normalised by the browser if necessary. For example:
<FRAMESET ROWS="2*,*">
Makes the top frame twice the height of the bottom frame.
<FRAMESET COLS="50,*,50">
Fixes the height of the left and right frames and allocates the remaining space in the window to the middle frame.
<FRAMESET ROWS="20%,60%,20%">
Displays a large middle frame between two smaller frames.
The above example shows three frames placed within a frameset. To create a more complex arrangement of web pages you can place a frameset and its associated frames within another frameset. This is known as nesting frames, and you can think of it in the same way as putting a table within a table.
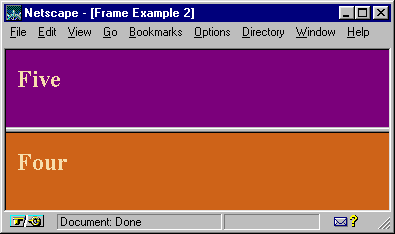
The example below shows how to nest frames by placing one frameset inside another. First we write a basic two row frameset:
<FRAMESET ROWS="*,50%">
	<FRAME SRC="five.htm">
	<FRAME SRC="four.htm">
</FRAMESET>
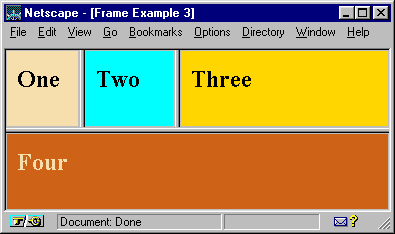
Now we replace the frame displaying page five.htm with the frameset in the first example (above):
<FRAMESET ROWS="*,50%">
	<FRAMESET COLS="80,25%,*">
		<FRAME SRC="one.htm">
		<FRAME SRC="two.htm">
		<FRAME SRC="three.htm">
	</FRAMESET>
	<FRAME SRC="four.htm">
</FRAMESET>
There is no limit to the number of frames you can nest, although be wary of using more than three frames on the screen as they can begin to make things very complicated for your readers. See WDG's excellent What's Wrong With Frames![]() for more guidance in friendly use of frames.
for more guidance in friendly use of frames.
A significant proportion of your readers will not be using a browser that supports frames. It is important, therefore that you provide content for non-frame browsers. The <NOFRAMES> element enables you to do this. You can put any content inside the <NOFRAMES>
</NOFRAMES> that you would normally place between the <HTML>
</HTML> tags. If you do not provide this content then a reader using a non-frames browser will not see anything, and will be forced to go elsewhere. Browsers that support frames ignore all content within the <NOFRAMES> tag.
<FRAMESET ROWS="*,50%">
	<FRAME SRC="five.htm">
	<FRAME SRC="four.htm">
<NOFRAMES>
	<BODY>
	<P>Welcome to my page.
	<A HREF="noframes.htm">Continue</A> to the frame-free version.</P>
	</BODY>
</NOFRAMES>
</FRAMESET>
As well as positioning your pages on the screen, you can also have some control over the frames themselves. You can remove the frame borders, colour them and change their width. Additionally you can put margins around your framed pages, remove the scroll bars and prevent resizing of the frames.
The following attributes can be applied to the <FRAMESET> element for additional control.
FRAMEBORDER="yes|no"|0
This attribute enables you to turn off the border around frames in the frameset. Currently Netscape Navigator 3 upwards uses the values
yes
and
no
, while MS Internet Explorer uses the value
0
(zero). For the borders to not be drawn, all the frames sharing a common border must have their FRAMEBORDER attribute set to "no". This attribute can be used with the
<FRAME>
tag to set the borders for a single frame.
BORDER=pixels
Netscape Navigator 3 only. This attribute allows you to set the width of the borders in a frameset;
defined in pixels.
BORDERCOLOR="#hexcolor|colorname"
Netscape Navigator 3 only. Allows the user to set the colour of the frame borders in a frameset, specified in the conventional RGB hex triplet. This attribute can be used with the
<FRAME>
tag to set the border colour for a single frame.
The following attributes can be applied to the <FRAME> element for additional control.
SCROLLING="yes|no|auto"
This attribute allows you to give the frame a scrollbar or not. The default is 'auto', which lets the browser decide whether the frame needs scrollbars and display them where necessary.
NORESIZE
This attribute will prevent the user from resizing the frame. By default the user can resize frames by dragging the the frame edge to a new position.
MARGINWIDTH=pixels
This attribute sets the left and right frame margins in pixels. By default, the browser will decide upon appropriate margin sizes.
MARGINHEIGHT="pixels"
This attribute sets the top and bottom frame margins in pixels. By default, the browser will decide upon appropriate margin sizes.
BORDERCOLOR="color"
Netscape Navigator 3 upwards only. Allows you to set the colour of the frame border, specified in the conventional RGB hex triplet. This attribute can be used with the <FRAMESET> tag to set the border colour for a group of frames.
FRAMESPACING="pixels"
MS Internet Explorer 3 upwards only. This attribute sets clear space around the frame;
defined in pixels.
FRAMEBORDER="yes|no"|0
This attribute enables you to turn off the border around a frame. Currently Netscape Navigator 3 upwards uses the values yes and no, while MS Internet Explorer 3 upwards uses the value 0 (zero). This attribute can be used with the
<FRAMESET>
tag to set the borders for a group of frames. Frame borders will only be turned off if both adjacent frames (even if they are in different framesets) have their FRAMEBORDER attributes set accordingly.
To create a seamless join between frames in both Netscape and Microsoft browsers, you must set the FRAMESPACING, FRAMEBORDER and BORDER attributes all to zero, as in the example below.
<FRAMESET COLS="120,*" FRAMEBORDER=0 BORDER=0 FRAMESPACING=0>
	<FRAME SRC="toolbar.htm" MARGINWIDTH=2>
	<FRAME SRC="frames/fintro.htm">
</FRAMESET>
One of the main benefits of frames is that you can use a link in one frame to open a page in another frame on the same page. A good example of this is Jalfrezi's toolbar (on the left). Clicking on a button opens up a new section in the rest of the page, while the toolbar remains static. This process is called targeting frames.
The first step to targeting is to name your frames. This is done in the frame definition document by using the NAME attribute of the <FRAME> tag.
<FRAME SRC="page32.htm" NAME="mainarea">
You target named frames using the TARGET attribute. This attribute is not found in the frame definition but is used within normal HTML documents to direct data to specific frames. Normally when a user clicks on a link, the new document appears in the same frame as the link. The TARGET attribute is used to direct data to different frame. We shall consider the TARGET attribute in terms of frames and the
<A>
tag. The TARGET attribute can also be used in a similar manner with the
<BASE>
,
<AREA>
and
<FORM>
tags. In order to direct data to a different frame, the receiving frame must have been named in the frame definition.
<A TARGET="mainarea" HREF="page2.htm">Page 2</A>
The above example would load the file
page2.htminto the frame named mainarea.
If the name in the TARGET attribute does not exist, the linked document will be opened as a new window, with a name as given in the TARGET attribute. The names must all begin with an alphanumeric character.
There are some special target names, called magic target names. These all begin with an underscore ( _ ) and are used to load pages into groups of frames.
TARGET="_self"
This causes the document to load in the same frame as the link.
TARGET="_parent"
This will cause the document to load into the same frameset as the link, thereby removing any 'sub-frames'. It is used in frame 2 of the example to return back to this page.
TARGET="_top"
This makes the document load into the full body of window, ie. getting rid of all frames. This is useful (and almost always required) when a link directs the user to another site.
TARGET="_blank"
This will cause the document to load into a new blank window.
The following example will use nested framesets to display frames in approximately the following fashion:
+------------+-------------------------+------------+
|            |                         |            |
|            |                         |            |
|            |                         |            |
|            |                         |            |
|            |                         |            |
|            |                         |            |
+------------+------------+------------+------------+
|                         |                         |
|                         |                         |
|                         |                         |
|                         |                         |
|                         |                         |
|                         |                         |
+-------------------------+-------------------------+
<HTML>
<HEAD>
<TITLE>Sizzling HTML Jalfrezi - frames example</TITLE>
</HEAD>
<FRAMESET ROWS="50%,50%">
    <FRAMESET COLS="150,*,150">
        <FRAME SRC="x_frame1.htm" SCROLLING="yes">
        <FRAME SRC="x_frame2.htm">
        <FRAME SRC="x_frame3.htm" NAME="frame3">
    </FRAMESET>
    <FRAMESET COLS="50%,50%">
        <FRAME SRC="x_frame4.htm" MARGINHEIGHT=50 MARGINWIDTH=50>
        <FRAME SRC="x_frame5.htm">
    </FRAMESET>
</FRAMESET>
<NOFRAMES>You do not have a frame-compatible browser - this example won't work without one.<BR>
<A HREF="frames.htm">Click here</A> to return to the Frames page.
</NOFRAMES>
</HTML>
The example shows all of the features of frames described above, including targeting windows and the NOFRAMES feature for non-frame compatible browsers.
Microsoft Internet Explorer 3.01 upwards supports the so-called floating frame. This is rendered using the
<IFRAME>
tag and enables you to place a frame at any point in a webpage.
I want to use frames on my site. Which page do I put my frame commands on?
Frames are displayed through a Frame Definition document. The frame definition describes the number and position of the frames and the URL of their contents. You cannot write the contents of the frames within the frame definition - these must always be held in separate documents.
How can I load documents into multiple frames from a single link?
I'll explain here how to load two frames at the same time. Let's assume you'd like your website to be set up as follows:
    +-----+----------------------------------------------+
    |     |                                              |
    |  A  |    B                                         |
    +-----+----------------------------------------------+
    |     |                                              |
    |  C  |    D                                         |
    |     |                                              |
    |     |                                              |
    |     |                                              |
    |     |                                              |
    |     |                                              |
    |     |                                              |
    |     |                                              |
    +-----+----------------------------------------------+
Where A is a static logo, C is the index, D is the main display area and B is the banner or header for each page, therefore as D changes, so should B. The trick to loading two frames at a time is to put the two frames within their own frame. This means you will have to write (at least) two 'frame definition' documents.
With respect to the above example, the first frame definition should define frame A, frame C and a third frame to contain frames B and D (we shall call this frame E). Frame E will contain the second frame definition which controls how frames B and D are displayed. By way of example, the first frameset should be something like the following. This example displays 'Section 1' as the initial page for the main display area. Notice the 'name' attribute in the second frameset.
<FRAMESET COLS="100,*">
	<FRAMESET ROWS="100,*">
		<FRAME SRC="logo.htm">
		<FRAME SRC="index.htm">
	</FRAMESET>
	<FRAME SRC="section1.htm" NAME="maindisplay">
</FRAMESET>
The second frame definition, contained in section1.htm, defines the header and main text for "Section 1":
<FRAMESET ROWS="100,*">
	<FRAME SRC="header1.htm">
	<FRAME SRC="text1.htm">
</FRAMESET>
To make all this function you will need to add the TARGET attribute to all the links in your index document, eg.
<A HREF="section1.htm" TARGET="maindisplay">Section 1</A>.
Multiple frame loads can also be performed using JavaScript.
How I do stop my webpages appearing inside other people's frames?
The only way to stop your web pages appearing inside other people's frames is to use JavaScript. If your own site does not use frames then you can employ the following script in each of your pages.
<BODY onLoad="if (self != top) top.location = self.location">
If your website does use frames then you will have to use JavaScript to frame proof your pages. The following code checks to see if a document is in a frame and, if it is checks that the frame is one that you have named. If the frame is not one you have named then your page must be in someone else's frames and the script clears the frames and loads a document of your choice.
<SCRIPT LANGUAGE="JavaScript">
<!--//
if (self != top) if ( top.frames[1].name !="mainarea") top.location = "http://htmlbyexample.com/index.htm"
//-->
</SCRIPT>
In the above example, the frame you're expecting the document be loaded in is called mainarea. If the script finds this isn't the case then it loads the file http://htmlbyexample.com/index.htm and displaces the existing frames. Place the script in the HEAD of your documents. See NetscapeWorld's The Best Way to Frame-Proof Your Pages![]() and Still More Tricks to Frame-Proofing Your Pages
and Still More Tricks to Frame-Proofing Your Pages![]() for more information.
for more information.
I've created a frameset but when I load it into Netscape Navigator, the page remains blank. Why?
The most likely problem is a <BODY> tag outside the <NOFRAMES> tags. If a <BODY> tag is present outside the <NOFRAMES> tags then Netscape browsers will completely ignore the frameset.
 |